Night Photography Tour Tips for Travelers Who Want Better Photos After Dark
Night photography feels simple until you are cold, your group is already moving, and every bright sign turns into a white patch. The best tips for a night photography tour have less to do with carrying more gear and more to do with making quick decisions in low light: where to stand, which settings matter, and when to accept a little noise so you do not lose the shot to blur.
For travelers who enjoy photography, the goal is not to wrestle with the camera all evening. It is to come home with sharper skylines, livelier street scenes, and a plan that fits the way you actually like to explore.
Key Takeaways
- Plan the evening before you go: blue hour, weather, safety, and your first shooting spot matter more than improvising.
- Carry a small kit you can use quickly. One familiar lens, spare batteries, and a lens cloth usually beat a heavy bag.
- If you are handholding, protect shutter speed first. A slightly noisy sharp frame is better than a clean blurry one.
- Tripods are worth carrying for skylines, reflections, and light trails, but they slow you down on fast-moving walks.
- Choose guided tours for efficiency and local help; choose self-guided walks for patience, repeat attempts, and full control.
Tips for a Night Photography Tour: Plan Before the Light Changes
Night shooting is less forgiving than daytime sightseeing. Missed focus, shaky hands, clipped highlights, and poor timing show up fast, and the best window often lasts only a few minutes.
Before you leave, check sunset, blue hour, weather, wind, and moon phase. Blue hour is usually the easiest time to balance sky detail with city lights, while full darkness gives you more drama but less room for exposure mistakes.
Research the exact viewpoint, not just the neighborhood. A location that looks good on a map may have floodlights, barriers, crowds, or tripod restrictions once you arrive.
Keep a short shot list of three to five images you actually want, such as a skyline, a landmark reflection, or a neon crossing. Add one more layer than you think you need and wear shoes with grip; standing still beside water or on damp pavement feels colder and less stable than a normal evening walk.
Bring a Kit You Can Use Fast
The most common travel mistake is carrying so much equipment that you stop reacting to the scene. One camera body and one lens you know well is often the most practical setup on a night walk.
- Fast prime lens: strong for markets, portraits, and handheld street scenes, but the fixed focal length can be frustrating when viewpoints are tight.
- Standard zoom: better when subjects keep changing, though it usually gives up some low-light advantage.
- Wide-angle lens: useful for architecture and cramped viewpoints, but weak compositions can make large scenes feel distant.
- Smartphone only: discreet and always ready, yet limiting for long exposures and difficult edits.
Bring a tripod only when the image depends on exposure time—clean reflections, low-ISO skylines, or deliberate light trails. On a guided route or in crowded streets, a full-size tripod can slow you down enough that a mini tripod, a clamp, or no tripod is the better call.
Spare batteries, a lens cloth, a remote or self-timer, and simple rain protection usually matter more than an extra lens. Pack so the camera, battery, and cloth are easy to reach in the dark, and use a bag that does not advertise expensive gear.
Camera Settings That Matter Most at Night
Night exposure is mostly choosing the least damaging compromise. If you are handholding, sharpness usually matters more than keeping ISO impressively low.
- Aperture: open wide when you need light or subject separation; stop down if you want more depth or cleaner point lights.
- Shutter speed: keep it fast enough for your focal length and subject movement unless blur is part of the idea.
- ISO: raise it sooner than many beginners expect. Noise is easier to live with than motion blur.
For many travelers, aperture priority with Auto ISO is the easiest tour setup, as long as you watch shutter speed and use exposure compensation when bright signs fool the meter. Manual mode makes more sense when the light is stable and you have time to refine a tripod composition.
Focus deserves extra attention. Autofocus often hunts in the dark, so use a bright edge or contrast point at the same distance as your subject, magnify live view if you can, and check sharpness before moving on. As Adobe’s night photography overview notes, missed focus is one of the most common night problems. If you want a broader refresher before your trip, this beginner guide to night photography from CaptureLandscapes is a useful companion.
RAW is usually the safer file format for night travel images because it gives you more room to recover highlights, color, and noise later. JPEG is faster to share, but it leaves less flexibility if the exposure is off.
Handheld or Tripod? Match the Tool to the Scene
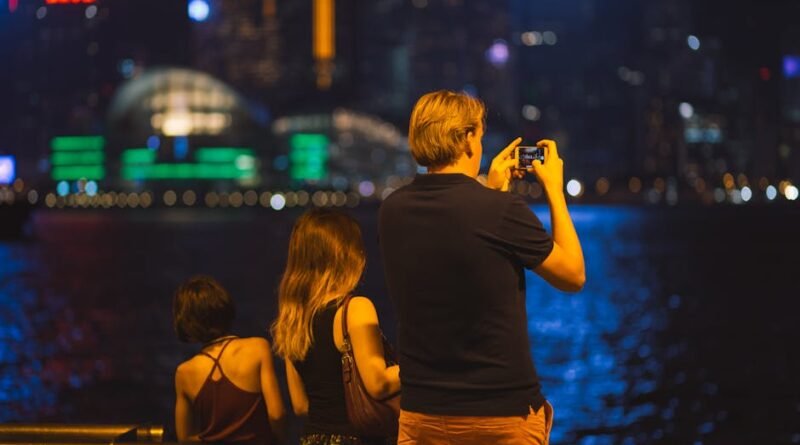
Handheld shooting is usually better for food stalls, performers, street portraits, and busy neon streets where the moment matters more than a perfect low-ISO file. To steady the camera, tuck in your elbows, breathe out gently, press the shutter instead of jabbing it, and use walls, railings, or a bag as improvised support.
Image stabilization can help with static handheld subjects, but it will not freeze a walking person or passing scooter. If the scene is moving, increase shutter speed and accept the ISO hit.
Use a tripod when the scene is static and time is the effect: smooth reflections, balanced skylines, or strong traffic trails. Keep the setup compact, stay out of walkways and stair tops, and take the shot without occupying the spot longer than necessary.
How to Shoot the Night Scenes Travelers Actually Find
Skylines and landmarks: start at blue hour if you can. The sky still holds detail, city lights are visible, and exposure is easier to manage than in full darkness.
Neon streets and traffic: decide what motion should do before you lift the camera. Freeze people and vehicles with a faster shutter, allow mild blur for energy, or use a tripod when you want longer trails.
Reflections: water and wet pavement work best when they are treated as part of the frame, not a bonus. A small change in height or angle can make the reflection stronger than the subject itself.
Markets and candid moments: stay mobile and watch the edges of available light from signs, stall lamps, and shopfronts. Waiting for a face or gesture to enter that light usually gives a better travel image than photographing a static display.
Bright signs and LED screens are the easiest way to ruin exposure. If they matter, expose for them first and then see how much shadow detail you can keep. Mixed lighting is normal at night, so choose which light source should look correct instead of trying to neutralize every color cast. If contrast is extreme and nothing is moving, bracketing can help, but it slows down a tour quickly.
Safety, Respect, and the Right Tour Style
Night photography narrows your attention, so safety has to be part of the routine. Use well-lit routes between stops, keep extra gear packed away until you need it, know how you are getting back, and leave if the area starts to feel wrong.
Be more careful with people and places after dark. Avoid assuming flash is welcome, lower the camera if someone is clearly uncomfortable, and stay discreet in sacred, memorial, or residential settings. Local rules on tripods, flash, and restricted areas are easier to respect early than argue about on site.
| Option | Best for | Main benefit | Trade-off |
|---|---|---|---|
| Guided night photography tour | First-time visitors, beginners, solo travelers | Efficient routing, safer access, and help with settings | You work on the group’s schedule and may not get long at one location |
| Self-guided night photo walk | Independent photographers, repeat visitors, patient shooters | Full control over timing, pacing, and repeat attempts | More planning, more navigation, and more chance of wasting time between spots |
If you are booking a tour, check whether it is designed for photographers or general sightseeing, how long stops last, whether tripods are practical, and what happens if rain changes the plan.
Quick Workflow After the Tour
Start by deleting misses: blur, bad focus, accidental frames, and near-duplicates. Night sets improve quickly when you keep only the sharpest version of each scene.
Then make small corrections to white balance, highlights, noise, and straightening without pushing the file until lights look harsh or people look plastic. Back up the images that night if you can, and keep the original card until you confirm the copy.
FAQ
Do I need a tripod for a night photography tour?
No. It helps for skylines, reflections, and light trails, but many travel scenes are easier to shoot handheld.
What is the best time to start?
Usually just before blue hour, so you can settle in before the light changes and use the easiest transition of the evening.
Should I use flash on a night photo walk?
Only when it is clearly appropriate and allowed. Flash can flatten the atmosphere and attract the wrong kind of attention.
Is a guided night photography tour good for beginners?
Yes. It is often the quickest way to learn safe locations, timing, and workable settings in a city you do not know yet.